
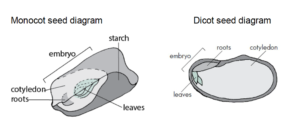
Teachers trying out the Growing Food with Hydroponics Seed Dissection activity may want to know more about this activity before using it with their students. This blog provides sample photos, discussion question answers, and data to help teachers see what they might expect when they run the Seed Dissection activity with their students. I’m including the seed diagram in the sample lab report, as it provides a good visual reference and introduction to terminology for students.
MATERIALS AND SET UP
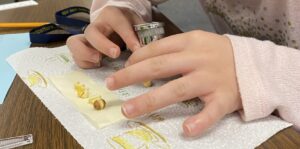
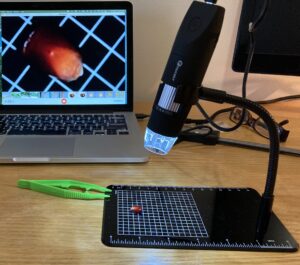
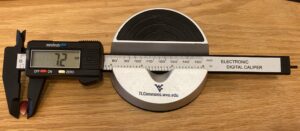
The previous post, Growing Food with Hydroponics–Seed Dissection, features an image of the materials used for the Seed Dissection lab. Here are two photos that show how the digital microscope and digital calipers can be set up and used by students.
DISCUSSION QUESTIONS
Record answers to these questions below. Discuss them with your lab partner or teacher.
1. What is the name of the plant for each of the seeds? What is the plant used for?
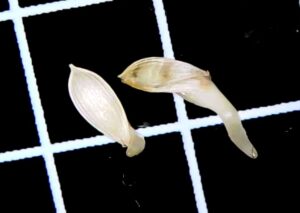
SEED 1: BISTRO, Shelling Peas (Pisum sativum), SEED 2: [Organic] MOFGA Romaine Lettuce (Lactuca sativa), SEED 3: BLOODY BUTCHER Dry Corn (Zea mays), SEED 4: Hybrid Bicolor Sh2 Corn SOLSTICE F1 (Zea mays), and SEED 5: VNS YELLOW PEA Field Peas (Pisum sativum).
2. What are the differences seen between the different seeds?
These seeds differ in size, color, shape, and texture. The images taken with a digital microscope illustrate each seed’s main features and the differences between seeds.

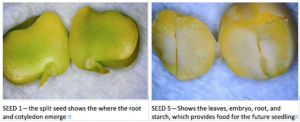
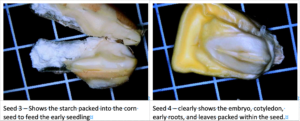
3. What part of the seed do you think gives the plants its food to grow? The starch.
4, What part of the seed might become a root, leaf, or other part of the plant?
The two types of pea seeds are similar in size and shape and structure. The seed embryo, cotyledon, leaves, and roots can be seen in the See d1 and 2 images below.
5. What do you think is the function of the hard outer coating?
The seed coat keeps the plant material inside protected from changing environmental conditions and prevents seed germination from starting until conditions are right.
6. How do you think soaking the seeds in water changed each type of seed?
Soaking the seeds in water softened the outer seed coat and allowed it to split open—letting germination begin and the new seedling to begin to form.
SEED CHARACTERSITICS CHART
|
Seed |
Size | Shape |
Texture |
|
Seed 1 |
5.9mm |
round |
smooth, wrinkled but less when wet |
|
Seed 2 |
3.9mm by 1.4mm |
elliptical, like a grain of rice |
hard outer shell |
|
Seed 3 |
12.2mm by 8.4mm |
Triangular |
Has a shiny, smooth outer skin |
|
Seed 4 |
10.0mm by 13.2mm |
Triangular |
has a smooth shell with a white center |
|
Seed 5 |
7.6mm |
round |
Smooth but fuzzy, not shiny |
Find out how to join the Growing Food with Hydroponics project by clicking the link below:
